Quick Jump To:
- What is Google for Jobs
- Setting up Google Indexing API
What is Google for Jobs?
Google for Jobs is a job search feature integrated into Google’s search engine that displays job postings directly in search results. When job seekers use Google to find job listings, Google scans the web, gathers information from job postings, and presents these jobs at the top of the search results in a dedicated job box. Integrating Firefish with Google’s Indexing API can boost your job postings in Google search results, reaching more potential candidates.
How Google for Jobs Pulls Job Adverts from Job Sites
Firefish optimises your job adverts to align with Google’s structured data requirements, ensuring they can be displayed in Google for Jobs search results.
How Google Recognises Job Adverts
Google identifies job postings by analysing their structured data, specifically their JobPosting schema. This schema provides detailed, standardised information about each job, such as the title, location, company, and salary. Structured data ensures Google can accurately interpret and present your adverts in search results.
With Firefish, this process is seamless. Our system automatically structures your job adverts to comply with Google’s requirements, making them eligible for indexing and display on Google for Jobs.
The Role of the Google Indexing API
Firefish integrates with Google’s Indexing API to notify Google when job adverts are created, updated, or removed from your website. This notification improves the chances of your job adverts being indexed promptly.
However, please note that Google no longer relies solely on the Indexing API to crawl and index job listings. Instead, Google prioritises content based on your site’s relevance, authority, and compliance with structured data standards.
How Google Prioritises Job Postings
Google for Jobs uses advanced methods to ensure only the most relevant and high-quality job postings appear in search results. To maximise your chances of having your job adverts displayed, consider the following key factors:
- Reliance on Structured Data (JobPosting Schema):
Google prioritises job postings that use structured data, specifically the JobPosting schema. This schema provides detailed and standardised information about the job, such as the title, location, company, and salary. Adhering to structured data requirements ensures Google can accurately interpret your job adverts and display them in a rich, informative format. Firefish automatically puts your Advert Content into this format for you for Google to Identify. - Focus on Content Quality and Relevance:
Rather than indexing pages solely based on indexing keys (e.g., the index directive in HTML), Google evaluates the overall quality of the content. Adverts must meet Google’s guidelines for clear, relevant job content and provide a positive user experience to appear in search results. To meet Google’s guidelines:
- Use clear and detailed job descriptions.
- Ensure your content is unique and not copied from other sources.
- Provide accurate and up-to-date information about the job.
Google aims to surface trustworthy and original job listings for users. Duplicate or low-quality content is less likely to be indexed. To improve your chances:
- Avoid duplicating job postings across multiple pages or sites.
- Focus on creating unique, valuable content for each job advert.
Strong SEO (Search Engine Optimisation) is critical for enhancing your site’s visibility and authority in search rankings. Google considers factors such as:
- Relevant keywords in your job descriptions and metadata.
- A well-structured website with clean URLs and logical navigation.
- Consistent updates to keep your content fresh and aligned with user queries.
By implementing robust SEO practices, you increase your site’s authority, making it more likely for your Job postings to appear in Google for Jobs results.
5. Enhancing User Experience:By emphasising structured data and content relevance, Google delivers fresher, more consistent job listings that align closely with user searches.
While Firefish ensures your job adverts meet Google’s structured data requirements and notifies Google via the Indexing API, these factors do not guarantee your adverts will appear on Google for Jobs. Google’s algorithms prioritise content based on your site’s quality, relevance, and authority in the job market.
Setting up Google's Indexing API in Firefish takes around 10-20 minutes. There are two main elements you need to configure:
- Google Indexing API: This API lets Google know whenever a job on your website is created, updated, or removed.
- Job-Posting Properties: These define how Google displays your job adverts, using specific fields from your Firefish settings.
Super Users can edit these by going to Settings > Integrations > Google Analytics.

Setting up Google Indexing API
Follow these 4 steps to enable the Indexing API between Google and Firefish:
Step 1: Create a Google Service Account and API Key
- Navigate to the Google Service Account page and create a project

- Give your project a name (i.e. Firefish API), leave Locations as No organisation, the click Create.

- Now click + Create Service Account, adding relevant details for Service account name and Service account description, then click Create And Continue

Keep a note of the email address associated with this service account for later use. - Now in Select a role, choose Basic > Browser,
 then click Continue
 - Leave the two fields under Grant users access to this service account blank, then click Done.
- Click the three dots under Actions, select Manage keys

- Click Add Key, then Create new key

- Choose JSON, then click Create. This will download a small file to your device, we recommend you open this using Notepad.
Did you remember to take a note of the Service Account Email Address earlier? Don't worry, you can click on the Details tab, and take a note of it - you'll need it in Step 3!

Step 1 (the longest part) is now completed!
Step 2: Enable the Google Indexing API
- Click APIs & Services

- Click + Enable APIs and Service

- In the search box enter "Indexing API", then hit Enter

- Click Web Search Indexing API

- Now click Enable

Step 2 is now completed!
Verify your website by visiting the Google Search Console.
- Choose the URL prefix option and enter your domain

- Select the HTML Tag verification option then copy the tag using the Copy button:
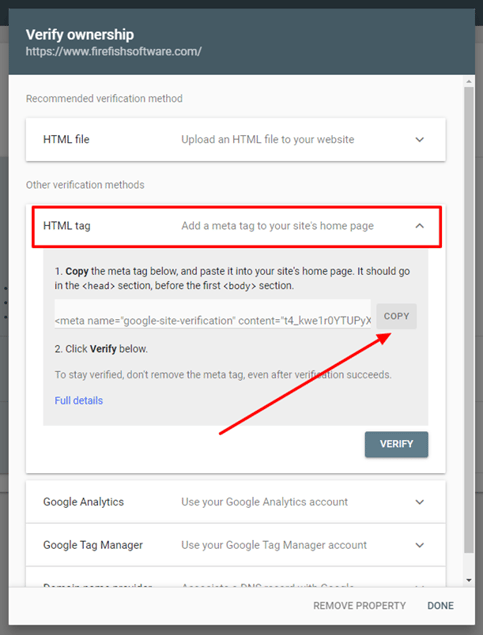
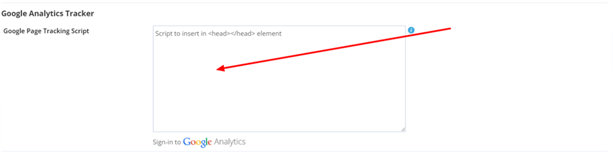
- Then you will need to Paste this into the Google Page Tracking Script box within Firefish, then scroll to the bottom of the page and click Save:
- Back on the Google Search Console, click VERIFY on the Google Search Console pop up, then click Go to Property.
- ALMOST DONE!!
- Go to Settings > Users and permissions

- Click Users and Permissions, then Add User, then enter the email address saved in Step 1, and grant Full permission, then click Add.

Step 3 is now completed!
Step 4: Add the API Key to Firefish
- Open the JSON file from Step 1, copy its contents
- Paste the script in Settings > Integrations > Google Analytics > Google Service Account Key in Firefish.
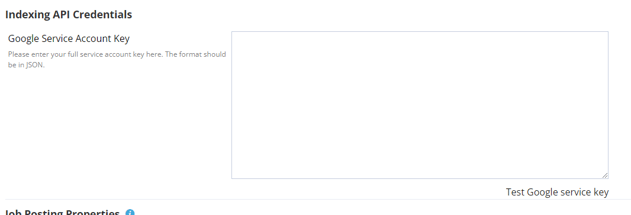
- Click on Test Google service key
- Finally, go to Website >Web Settings>Tracking Codes in Firefish and ensure the checkbox for Enable search engines is ticked:
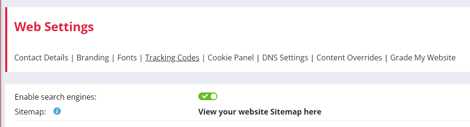
Step 4 is now completed and your integration is completed! 🎉
Firefish allows you to choose what information Google picks up from your adverts.
Super Users can select the info by going to Settings >Integrations>Google Analytics and scroll down to the Job Posting Properties section
Firefish displays all of the required fields by default and next to each field you'll see a brief description.
Simply tick or un-tick the fields to choose what you want to display.
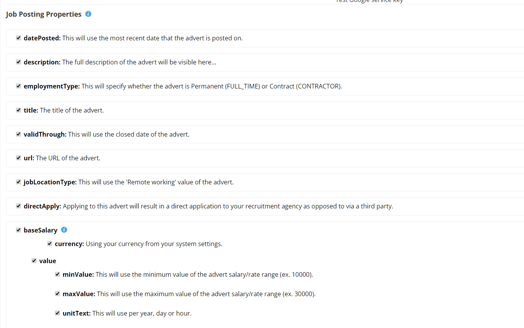
Please note: Certain fields are mandatory and/or recommended.
A red warning will appear if a field is mandatory and an orange warning if a field is recommended.
Here is a list of the kind of information you can choose to display to Google:
|
Property |
Description |
Required/Recommended |
|
datePosted |
This will use the most recent date that the advert is posted on. |
Required |
|
description |
The full description of the advert will be visible here. |
Required |
|
employmentType |
This will specify whether the advert is Permanent (FULL_TIME) or Contract (CONTRACTOR). |
Recommended |
|
title |
The title of the advert. |
Required |
|
validThrough |
This will use the closed date of the advert. |
Required |
|
url |
The URL of the advert. |
Recommended |
|
jobLocationType |
This adds a checkbox option to your adverts to mark them as Working from Home |
Recommended |
|
baseSalary |
|
|
|
currency |
Using the currency from your system settings. |
Recommended |
|
minValue |
This will use the minimum value of the advert salary/rate range (ex. 10000) |
Recommended |
|
maxValue |
This will use the maximum value of the advert salary/rate range (ex. 30000). |
Recommended |
|
unitText |
This will use per year, per day or per hour. |
Recommended |
|
hiringOrganization (at least 1 of the following fields required) |
|
|
|
name |
The name of your company. |
Recommended |
|
sameAs |
Your website address. |
Recommended |
|
logo |
The URL of your social sharing logo. |
Recommended |
|
jobLocation (at least 1 of the following fields required) |
|
|
|
streetAddress |
The street address of the company associated wit the advert. |
Recommended |
|
addressLocality |
The town of the company associated with the advert. |
Recommended |
|
addressRegion |
The county of the company associated with the advert. |
Recommended |
|
addressCountry |
The country of the company associated with the advert. |
Recommended |
|
postalCode |
The post code of the company associated with the advert. |
Recommended |
Once you've decided which properties should be included in your adverts on Google, you can use Google's Testing Tool to test that all the fields are getting picked up correctly and preview how it will look on Google for Jobs listings.