How to update and import fonts to your website.
Firefish websites allow you to apply custom styles and fonts to your website, to keep in line with your branding. The below guide will walk you through the process to do so.
The font management page is available for superusers and marketing users only. To navigate to this page, go to website > web settings > font.

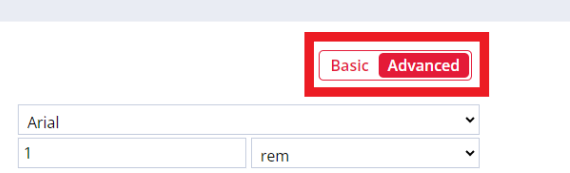
Basic / Advanced
You have the option to access a simplified version of this page by selecting the basic toggle. Alternatively, you can select the advanced toggle to apply more specific settings and values to your font and styling.
Switching between pages
When you make a change to your advanced settings and hit the save button, you will no longer be able to return to the basic settings page. You will see a warning message appear.
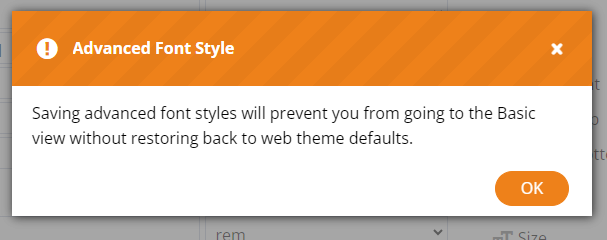
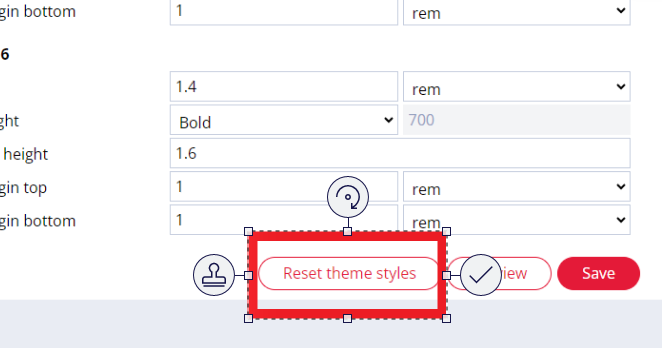
To return to the basic settings page, you will need to reset your styles to the default. You can do this by clicking on the link at the top of the page, or clicking 'reset theme styles' at the bottom of the page.
Font
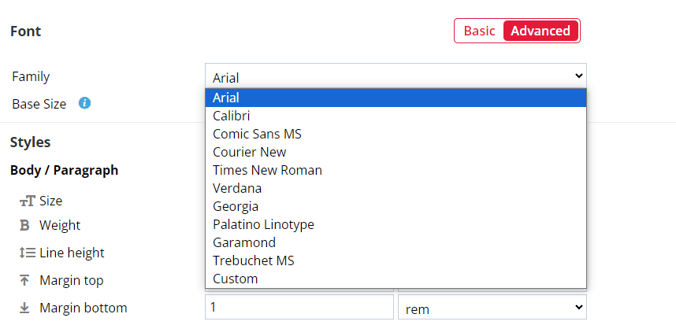
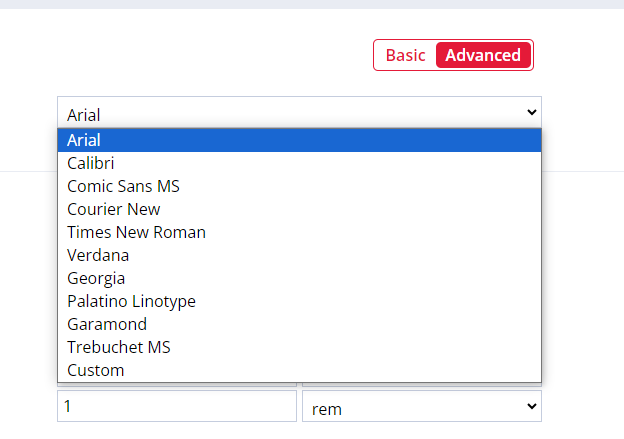
The basic settings will give you the ability to select a font family from the drop-down, these include:
-
Arial
-
Calibri
-
Comic Sans MS
-
Courier New
-
Times New Roman
-
Verdana
-
Georgia
-
Palatino Linotype
-
Garamond
-
Trebuchet MS
-
Custom*
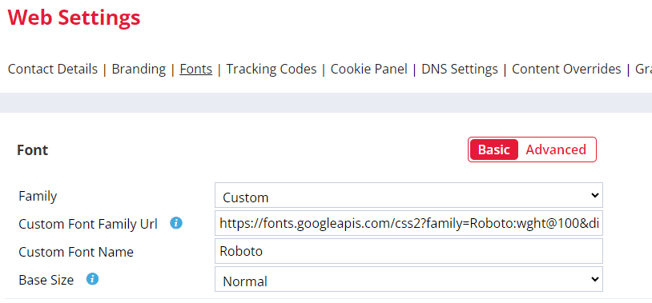
Custom Font
Selecting the custom option will trigger a font URL and name field to appear.
Google Font
- Navigate to the google font page by clicking here.
- Search and select a font you wish to use on your website.
- Click 'Get font'.
- Click 'Get embed code'.
- Click 'Change styles', and deselect any styles you do not want to import (Regular 400 is usually all which is needed)
- Within the 'use on web' section, click '@Import'.
- Highlight the URL from the embed code field to match the below format, and copy and paste this into your custom URL field in the CMS.
- https://fonts.googleapis.com/css2?family=Roboto:wght@100&display=swap
- Highlight the font name from the CSS class field to match the below format, and copy and paste this into your custom font name field in the CMS.
- "Roboto", sans-serif
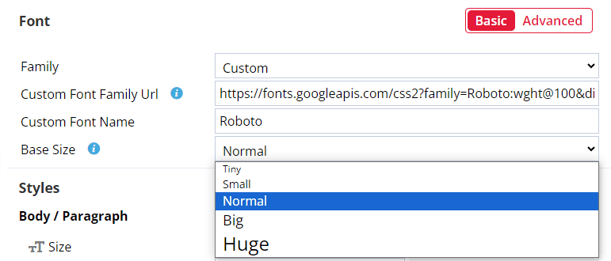
Base Size
You will be required to select a base size for your font, this will be the core value that drives your font sizes.
Changing this will affect the font size within the site. Changing this can impact all heading and paragraph font sizes, depending on which units are used.
You can select from the following options:
-
Tiny
-
Small
-
Normal
-
Big
-
Huge
Styles
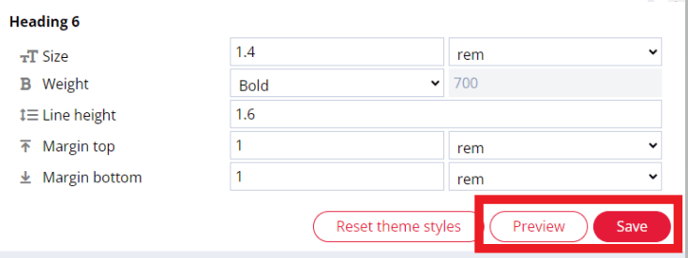
You can click the edit button to access the size and weight values for your body and header styles.
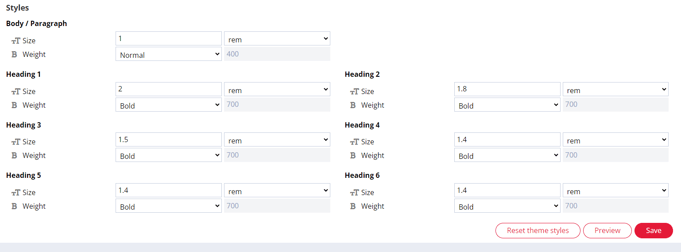
Size
You can select the values and units for your font size.
We would recommend using rem for the best, most consistent results. Other units (em, %, and px) should only be used by advanced users to prevent compounding issues and a lack of responsiveness.
The units available to use are listed below:
- rem
- 1rem as a Base Size usually converts to 16px on desktop, but users can change this to be bigger or smaller depending on their needs and preferences
- When rem is used as the unit for text, the rendered size of the text is based on the page's Base Size (e.g. if the Base Size is 2rem and there is a header which is 2rem, the header will be rendered as 4rem)
- Using rem allows text sizing across a page to be consistent, regardless of its location
- We would suggest using 1rem as your Base Size, and using rem as a unit for body/paragraph and heading text, to ensure your site is responsive and your text is consistently sized
- em
- 1em as a Base Size usually converts to 16px on desktop, but users can change this to be bigger or smaller depending on their needs and preferences
- When em is used as the unit for text, the rendered size of the text is based on the font size of the parent element the text is contained in (e.g. if the font base size of a parent element is 16px, and text in a child element is 2em, the child element text will be rendered as 32px)
- 1em as a Base Size usually converts to 16px on desktop, but users can change this to be bigger or smaller depending on their needs and preferences
-
- em is very similar to rem in that it allows font size to act dynamically in response to a font size used elsewhere on the page, but it can also be used to have text of the same type (body or heading) which is sized differently based on its location
- As text using em uses the font size of the web element it is nested in, rather than the Base Size of the entire page, using em as a unit may be beneficial if you have a lot of bespoke code on your site to ensure text is appropriately scaled. However, compounding can occur if a page element has multiple nested layers using em, resulting in inappropriately sized text (e.g. with a Base Size of 16px, a web element with three layers which each have their own font size of 2em can result in text which is 128px)
- %
- 100% as a Base Size usually converts to 16px on desktop, but users can change this to be bigger or smaller depending on their needs and preferences
-
- When % is used as the unit for text, the rendered size of the text is based on the font size of the web element the text is contained in (e.g. if the font base size of a parent element is 16px, and the text in a child element is 50%, the child element text will be rendered as 8px)
-
- % is similar to em, but may be more user friendly (e.g. if your Base Size is 16px and you want text to be twice the size, 200% may be easier to understand than 2em)
- px
- When px is used as the unit for text, the size of the text is static, and does not adapt based on the location of the text or the size of the screen
- px refers to the height of the text (e.g. text that is 16px will have its tallest letter be 16 pixels tall)
- If the size of text should be fixed and not change (e.g. if it is pivotal to the layout of a page), px can be used
Weight
You have the option to choose if your font will be bold or standard.
-
Normal = 400 weight
-
Bold = 700 weight
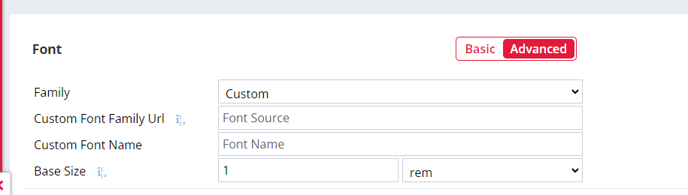
Advanced Settings
Font
The basic settings will give you the ability to select a font family from the drop-down, these include:
-
Arial
-
Calibri
-
Comic Sans MS
-
Courier New
-
Times New Roman
-
Verdana
-
Georgia
-
Palatino latui Linotype
-
Garamond
-
Trebuchet MS
-
Custom*
Custom Font
Selecting the custom option will trigger a font URL and name field to appear.
Google Font
- Navigate to the google font page by clicking here.
- Search and select a font you wish to use on your website.
- Click 'Get font'.
- Click 'Get embed code'.
- Click 'Change styles', and deselect any styles you do not want to import (Regular 400 is usually all which is needed)
- Within the 'use on web' section, click '@Import'.
- Highlight the URL from the embed code field to match the below format, and copy and paste this into your custom URL field in the CMS.
- https://fonts.googleapis.com/css2?family=Roboto:wght@100&display=swap
- Highlight the font name from the CSS class field to match the below format, and copy and paste this into your custom font name field in the CMS.
- "Roboto", sans-serif
Base Size
You will be required to select a base size for your font, this will be the core value that drives your font sizes.
Changing this will affect the font size within the site. Changing this can impact all heading and paragraph font sizes, depending on which units are used.
You can drive this by adding custom values and selecting a unit.
Styles
You can click the edit button to access the size and weight values for your body and header styles.
Size
You can select the values and units for your font size.
The units available to use are listed below:
-
rem
-
em
-
%
-
px
Weight
You have the option to choose if your font will be bold or standard.
-
Normal = 400 weight
-
Bold = 700 weight
-
Custom = Custom Value
Line Height
You can customise the line height between each of your headers and your body text.
Margin Top and Bottom
You can select the size of the margin for the top and the bottom of your text. You can select the units for these values from the below:
-
rem
-
em
-
%
-
px
Preview and Save
You can preview your font styles before you save any changes. Click the preview button at the bottom of the page to get a pop-up preview of your website. You can navigate around via your menu and see how your new font styles look with your content!