This article will walk you through the tasks section on a candidate record and how you can use the area to cleanse your database.
You should review each Candidate record by checking their CV, skills, employment history and preferences. Based on this information you can decide if they are a strong candidate or perhaps one you would rather cleanse from the system.
In the Tasks section of a Candidate record, there are a host of available actions that you can take from merging records, suggesting the Candidate to another user and sending their CV to a contact.
Suggest
To recommend a candidate to a colleague, first access their record and review their CV, skills, employment history, and preferences. If you believe they’re a strong fit, click the Tasks button in the candidate header then choose Suggest.
Next, select the user you want to recommend the candidate to. Include a brief note and a star rating to indicate their suitability. After filling in this information, click Confirm.

Your colleague will then see a notification for the suggested candidate on their to-do list. By clicking on it, they can view the candidate’s profile along with your note and rating.

This streamlined process promotes team collaboration and improves the chances of finding the right talent, making your recruitment efforts more efficient.
Delete
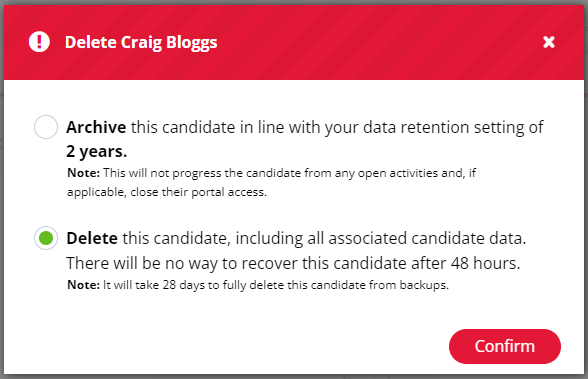
To delete a candidate from a candidate's record click on Tasks and then Delete.

You will then get the below pop-up, and you should select the Delete option then Confirm.
(If you find that the Delete option is greyed out that means you don't have permission to delete candidates).
This marks the candidate for deletion and a bin icon is displayed in the header section. A tooltip on the bin icon will show that the Candidate has been marked for deletion, who marked them and when they did it.
The candidate is not-progressed from jobs, no longer receives job alerts etc, but their data is not yet removed. You have 48 hours where you have the option to Unmark for Delete, after which the data is deleted.
Archive
To delete a candidate from a candidate's record click on Tasks and then Delete.

You will then get the below pop-up, and you should select the Archive option. You will be prompted to select a reason from the drop down available, and you can also add any notes if you wish. Once you're reach you can select Confirm.

The candidate is now archived and an archive bin icon is displayed in the header section, as well as an Unarchive button which will show in the middle of their record.

You can learn more about what it means to archive a candidate in this article.
Consider
To consider a candidate to a job, select Tasks and then Consider. This will open a pop-up which allows you to search for any job within the system.

You can search for and consider the candidate to as many jobs as you like within the pop-up without having to reopen it.
If you add a job in error, you can select the red bin icon to the right of the corresponding job to remove it from the list.
Once you're finished, just hit Confirm.
The candidate will then appear on the considering tab to the job(s) you considered them to.
Merge
Sometimes you might find that you have duplicate Candidate records on the system. This usually happens when a Candidate registers themselves with you using a different email address to one you hold, or one of your users may create the duplicate in error. When this happens, we have a simple fix.
On the Candidate record, click Tasks and then Merge.

You can then search for the other record using either their record ID, name or email address. Once you have located the correct candidate you can choose the reverse the order of the merge if you wish. The record which shows at the bottom is the record which will be kept as the 'master'.

Once you have the Candidate's showing in the correct order, hit Confirm.
Any information which is populated on the secondary record which is not already completed on the master record will be ported over. Any information which is already completed on the master record will not be updated, but it will remain on the secondary record. The secondary record will be archived.
For example, if both records contain a phone number, the master record will keep the phone number which is logged. The secondary record will be archived automatically, and the phone number on this record will still show here. This ensures that no information is lost during the merging process.
You can learn more about Candidate merging here.
Send CV on Spec
Once you have reviewed the Candidate's record you may wish to send their CV to some Contacts. There are a variety of methods you can use to send a CV on spec via the system, but we're going to look at how you can do this directly from the Candidate's record.
To send a CV on spec directly through a Candidate record, select Task and then CV Sent on Spec.

The below pop-up will appear. You will be able to search for the Company that the Contact works for, then you'll be able to choose the Contact you wish to send the CV to.

The email which generates is the Send CV on Spec email template which can be configured by a Super User in the settings. You can also amend the email as you see fit prior to sending.
The candidate's formatted CV and your company Terms will automatically attach to the email.
Once you're happy with the email, hit Send.

