When a candidate accepts a contract job offer, you can log the placement to complete the recruitment journey. This article explains how to create the placement, record fee splits and make changes once the placement is confirmed.
To place a candidate, you should first of all ensure that they're in the Offer stage. You should also make sure they are showing as 'Ready to Place' in the compliance column.

Depending on your settings, this may be something a Super User or Compliance user needs to authorise.
The compliance at the job offer stage is completely customisable too, but this needs to be completed before a placement is made.
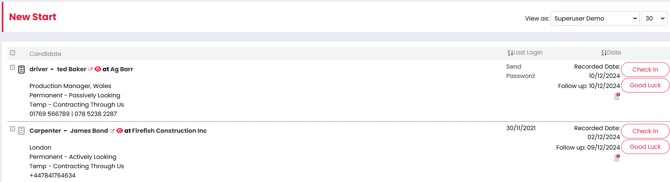
Candidate's will have one of the following compliance status':
- Green - Ready to place
- Orange - Incomplete
- Blue - Requested
Once the compliance has been completed, the status will change to "Ready to Place".
When the candidate's are all in the Offer tab show showing Ready to Place:
-
Selecting the candidate
- Click Place

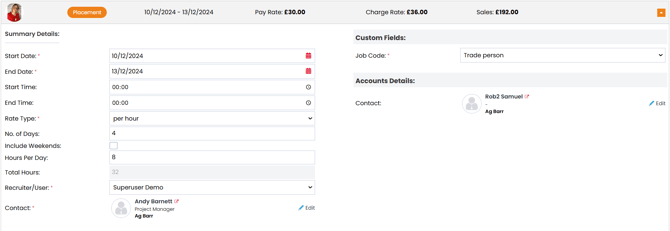
- Before confirming the placement, you'll have a final opportunity to edit the placement details:
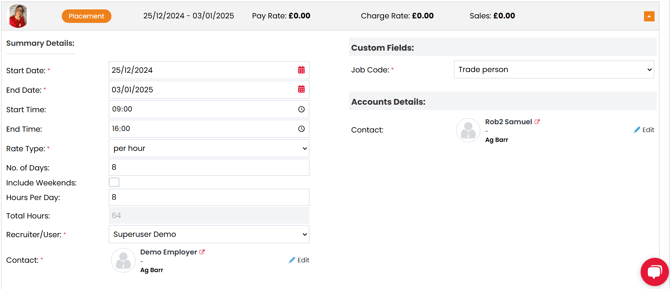
From this page you can make any amendments to the start date or pay if these have been negotiated since the offer was made.
If a candidate you are placing or extending is a Hot Candidate, their Hot status will automatically be removed when the Placement or Extension is confirmed. This will help identify your remaining Hot Candidates who are still available for opportunities. Hot Status can be manually re-added within the Candidate Record.
Once you're happy with the placement details, click Confirm to progress.
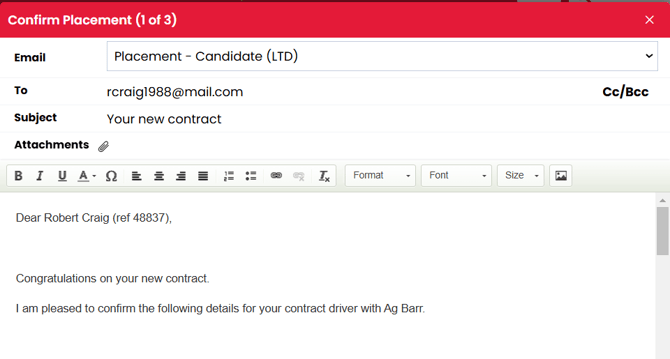
Upon clicking to Confirm a placement, a window will open giving you the option to choose which Candidate Contract and/or Employer Contract template you want to use for this particular placement:
-
Pick the contract(s) that you want to use from the 'Template' drop down then click Create to generate the contract. If you don't wish to send a contract, choose the 'No Contract Required' option.
-
At this stage any merge fields included in your contract template will be populated with details from the job.
-
You can also edit the document to make any final amendments.
-
You will also be able to enable your Candidate and Employer Contracts for Document eSign, allowing the candidate and contact to sign their contracts electronically. Full details on how to use this feature can be found here.
- Send when ready.
Your Candidate Contract will attach to the candidate email and your Employer Contract will attach to the contact email.
Super Users will need to activate this setting in the Document Library if you wish to utilise this feature.
After you've sent (or skipped) the placement emails you'll be taken back to the Placement page where you'll now see the Candidate/Employer contracts saved against the placement
The Contract Template is also saved (always as a Word document) in case you want to regenerate the contracts after making a change to the placement details. This means merge fields will be populated just as they were in the first draft of the contract.
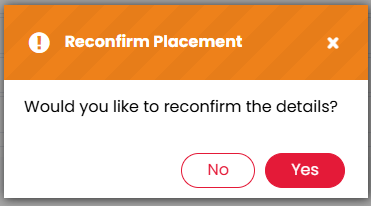
To regenerate your contract(s) simply click the blue pencil icon at the top right of the placement, make your changes, click Save then Yes when asked if you'd like to Reconfirm the placement details
-
Clicking Yes will save changes and regenerate contracts and emails to the candidate, contact, HR and Accounts.
-
Clicking No will still save the changes to your placement but without regenerating contracts and emails.
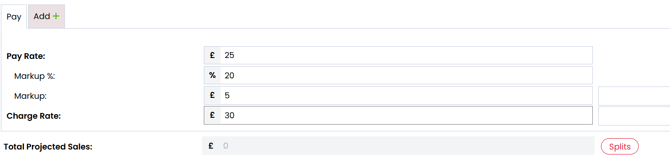
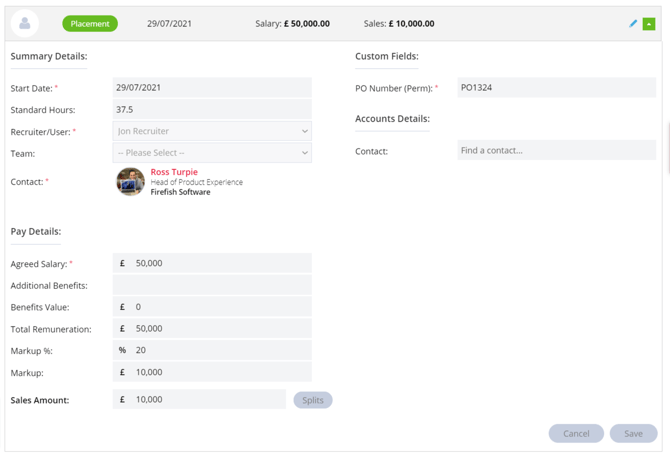
If you've been working on this role with a colleague, you can add use the Splits button to split the sales between you and a colleague:
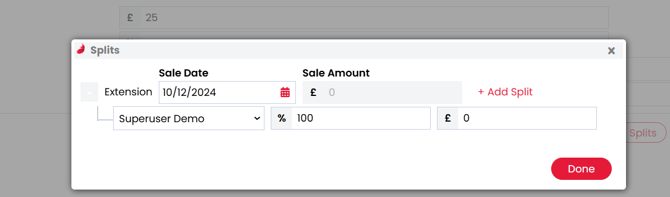
This will open up a new window allowing you to Add Split and split the fee between you and a colleague. You can add up to 3 splits on any placement:
Once you confirm the placement, emails will be generated to the candidate, contact, HR and Accounts (if email addresses are populated in your job configuration).
After you either skip or send these emails, a pop up will appear giving you the option to unsubscribe the placed candidate from future email marketing or job alerts:
Your placed candidate will then be listed in the Placements tab of the job workflow.
Your Sales Plan will also be updated to include the new placement figures - find out more about recording permanent or contract sales figures.
Once a candidate has been placed in either a contract or a permanent job, you can edit their placement details any time through the Placements tab on the job workflow:

Click the cog at the right hand side of the placement then Edit to bring up the placement details and make any required changes.
You'll notice the Placement icon change to orange, this means you're in editing mode. While in editing mode, you can edit any summary details, custom fields and/or pay details including sales figures and splits.
Once you've made the necessary changes, remember to Save the changes.
You will be asked if you wish to Reconfirm the placement.
-
Clicking Yes will save changes and regenerate contracts and emails to the candidate, contact, HR and Accounts.
-
Clicking No will still save the changes to your placement but without regenerating contracts and emails.
You'll see a "Saved Successfully" message and your placement will go back to green to confirm you're no longer in editing mode:
Once you have made a Contract Placement, Firefish gives you the option to Roll On that contract by changing the End Date. This can be done for individual contracts or for multiple contracts in bulk.
This is particularly useful if you have a high volume of contractors who have their contract updated week by week.
To roll on a contract you'll need to navigate to your Contracts Ending to do list, which can be found in the Jobs section on your Dashboard; (If you've chosen to call your workflow Temp then this may appear as Temps Ending).
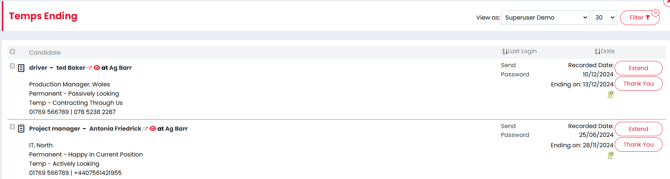
Select the contract(s) that you would like to roll on by ticking the checkbox on the left-hand side and if you scroll down to the bottom of the page you'll now see that the Roll On button on the bottom right has been enabled

Clicking Roll On opens a new pop-up where you can select your new contract(s) End Date. You must select a new date that falls after the very last end date of any of the contracts you are rolling on. This new End Date will be applied to all contracts you have selected
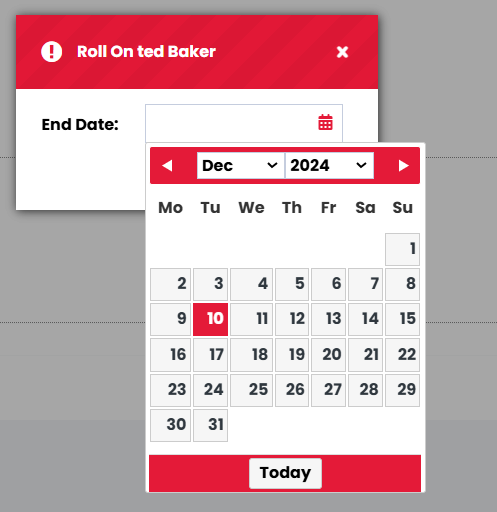
Once you are happy with the new End Date, click Confirm. Your selected contract(s) will now be updated with the new end date and will no longer be listed on the Contracts Ending to do list in the Jobs section on your Dashboard.
Your Sales Figures will automatically be updated to reflect your changes and each candidate will display a new action in their recent activity titled Roll On - Contract. This action displays the new End Date as well as linking to the Job, Contact and Company.
Making a Bulk Placement
To create a bulk placement, follow the steps below to ensure all candidates are ready and their placement details are correctly completed.
1. Move All Candidates to the Offer Stage
Before you begin, make sure every candidate you want to place is at the Offer stage.
If any candidates haven’t had an offer logged:
-
Go to the workflow
-
Tick the relevant candidates
-
Select Offer at the bottom of the screen
-
Complete the offer details when prompted
2. Complete Compliance for All Candidates
Every candidate must have their compliance marked as complete before they can be placed.
-
Look for the orange ‘Incomplete’ lozenge next to any candidate
-
Click the lozenge and complete the required fields
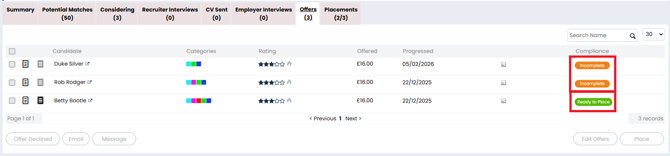
Once done, candidates will display the green ‘Ready to Place’ lozenge.
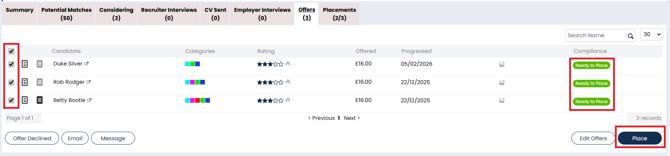
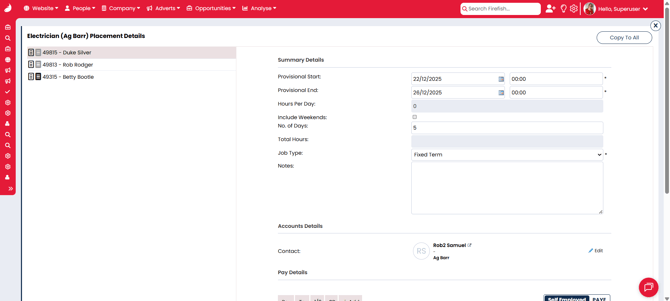
3. Select Candidates and Enter Placement Details
-
Tick all Ready to Place candidates from the left-hand side
-
Click the Place button
A list of selected candidates will appear, where you can:
-
Confirm or update placement details such as rate and start date
-
Use the Copy to All button (top right) if the details are the same for every candidate
Once all fields are completed, click Confirm.
4. Confirm and Send Emails
Clicking Confirm will generate the placement confirmation emails.
Note: Bulk placement is a quick placement method and will not generate contracts for contract jobs.
The following email inserts can be used to automatically pull through each candidate’s details:
-
Placement Details
-
Placement - Accounts
-
Placement - HR
These ensure every candidate’s information is included in the relevant Contact, Accounts, and HR emails. Each candidate will still receive their individual placement confirmation.
After emails are sent or skipped, you’ll be taken to the Placements tab where all placements for the job will be visible.