When a candidate accepts a permanent job offer, you can create a permanent placement to complete the recruitment journey. This article explains how to create the placement, complete compliance steps, record fee splits and make changes once the placement is confirmed.
In this article
Create a Permanent Placement
To record a permanent hire:
-
Go to the Job record.
-
Select the Applicants tab.
-
Choose the successful candidate.
-
Click Place to begin the permanent placement workflow.
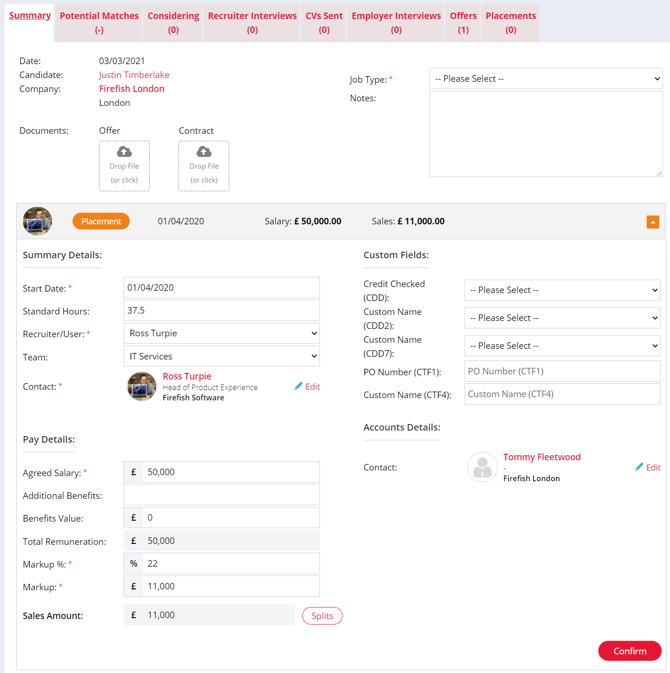
You will now be taken through the placement details such as salary information, start date and any additional fields required by your business.
Complete Compliance Information
If your compliance settings require specific checks for permanent roles, you will be prompted to complete them before confirming the placement.
-
Review each compliance item shown on screen.
-
Complete any missing information or upload the relevant documents.
-
Once everything is complete, click Confirm Placement.

When confirmed, Firefish will:
-
Remove the candidate’s Hot Candidate status (if applied)
-
Unsubscribe the candidate from marketing (based on your compliance settings)
-
Generate any documents or triggers configured in your workflow
Record Fee Splits
If more than one consultant contributed to the placement, you can record fee splits:
-
In the placement window, open the Fee Splits section.
-
Add each consultant and enter their percentage share.
-
Ensure the total allocation equals 100%.
-
Save your changes.


These splits will feed into your performance and sales reporting.
Editing a Permanent Placement
You can update the details of a permanent placement after it has been created. To edit:
-
Open the placement from the candidate record or the job record.
-
Select Edit Placement.
-
Update fields such as employment details, fee information or start dates as permitted.
-
Save your changes.

Note: Editing a placement may affect sales performance figures. Only users with the correct permissions will be able to make changes.
Making Bulk Placements
To create a bulk placement, follow the steps below to ensure all candidates are ready and their placement details are correctly completed.
1. Move All Candidates to the Offer Stage
Before you begin, make sure every candidate you want to place is at the Offer stage.
If any candidates haven’t had an offer logged:
-
Go to the workflow
-
Tick the relevant candidates
-
Select Offer at the bottom of the screen
-
Complete the offer details when prompted
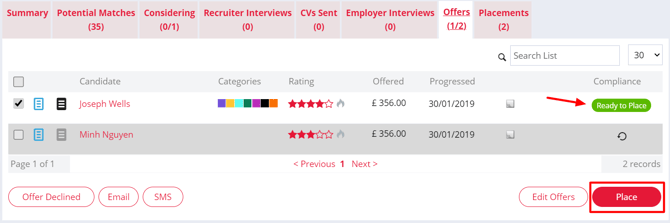
2. Complete Compliance for All Candidates
Every candidate must have their compliance marked as complete before they can be placed.
-
Look for the orange ‘Incomplete’ lozenge next to any candidate
-
Click the lozenge and complete the required fields

Once done, candidates will display the green ‘Ready to Place’ lozenge.
3. Select Candidates and Enter Placement Details
-
Tick all Ready to Place candidates from the left-hand side
-
Click the Place button

A list of selected candidates will appear, where you can:
-
Confirm or update placement details such as salary and start date
-
Use the Copy to All button (top right) if the details are the same for every candidate
Once all fields are completed, click Confirm.
4. Confirm and Send Emails
Clicking Confirm will generate the placement confirmation emails.

The following email inserts can be used to automatically pull through each candidate’s details:
-
Placement Details
-
Placement - Accounts
-
Placement - HR
These ensure every candidate’s information is included in the relevant Contact, Accounts, and HR emails. Each candidate will still receive their individual placement confirmation.
After emails are sent or skipped, you’ll be taken to the Placements tab where all placements for the job will be visible.

Frequently Asked Questions
Can I edit compliance documents after confirming a placement?
Yes. You can upload or replace documents from the candidate’s compliance tab.
Does confirming a placement unsubscribe the candidate from all communication?
No. Only marketing communications are affected. Job alerts and transactional messages continue as normal.
Why can’t I edit certain placement fields?
Your user permissions or system settings may restrict editing after confirmation.
Can I reopen a placement if the start date changes?
You can edit the start date, but you cannot reopen a placement once confirmed.