Firefish's Time Capture feature allows you to keep accurate timesheets for all of your contract placements. When Time Capture is enabled you can log specific details about the hours worked - or not worked - by your contracted candidates, broken down into not just overall days worked in a week, but hours in the day with corresponding pay types.
✏️Contract Time Capture are only available to Professional & Enterprise Customers as an Optional Module
Watch our video tutorial below which walks you through how to activate and utilise the Time Capture feature:
![]()
Activating Time Capture
To activate Time Capture go to Settings (cog) then open up Job Configuration. You then need to open the Contract Workflow tab (sometimes labelled 'Temporary Workflow' depending on your organisation's preference), and then into the In Contract tab. 
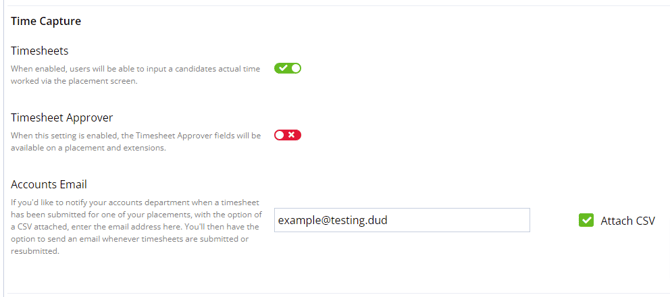
You can then scroll down to the Time Capture section on this screen and switch on Timesheets: 
If you'd like to notify your accounts department with an email when a timesheet has been submitted for one of your placements, enter the email address in the Accounts Email field.
Using Time Capture
Once timesheets have been enabled, the Time Capture column will show on the Placements tab of contract jobs:
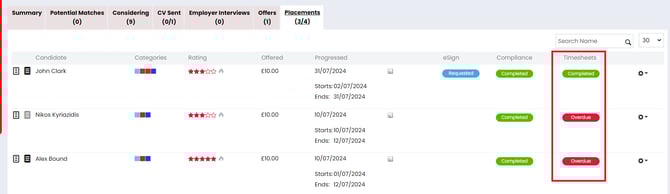
In the Time Capture column you can easily see the current status of the timesheets for each candidate placed against the contract job. The Time Capture statuses are:
- Completed – All time entries are complete.
- Incomplete - The current weeks time entry is not competed.
- Overdue – The time entry has not been completed for a previous week.
- Submitted - The time entry has been submitted to Tempaid via the Tempaid Integration.
Clicking on the Time Capture status icon will open a side panel allowing you to update the Hours/Days that a candidate has worked for the week, and upload any relevant documents to the timesheet.
The coloured dot in the top left hand corner of the timesheet indicates if the timesheet for the week being viewed is overdue (red), incomplete (orange) or complete (green).
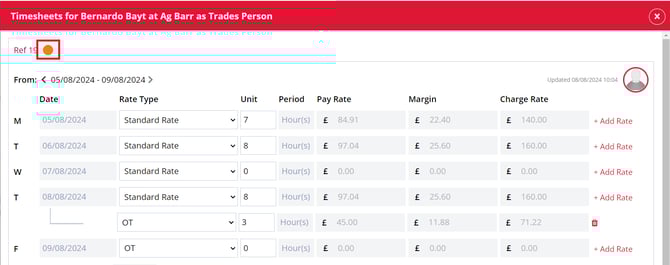
You can adjust the week that you are viewing by using the forwards and backwards arrows in the top left hand corner of the timesheet.
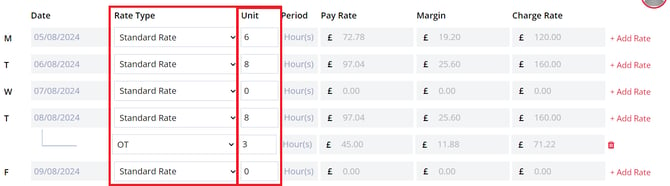
You can set the Rate Type in the Rate Type Column, and adjust the hours worked in the Unit Column. For example, if a candidate worked only 6 hours rather than the planned 8 hours, you can amend the unit field to reflect this:
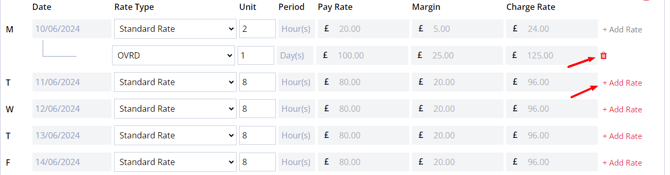
You’re able to add the details of any additional rates that have been worked by selecting +Add Rate. For example, you may with to log an overtime or holiday rate. This will add an additional row to the day where you can update the details of the additional rate. If there are multiple rates available, the correct one can be selected from the dropdown:
- The Save All button saves changes across multiple timesheets
- The Save button saves changes to the timesheet you are currently viewing
- The Complete button completes the timesheet you are currently viewing, making the fields read-only and changing the status to 'Complete'
When a timesheet has been completed, edits can still be made by selecting the blue pencil icon.

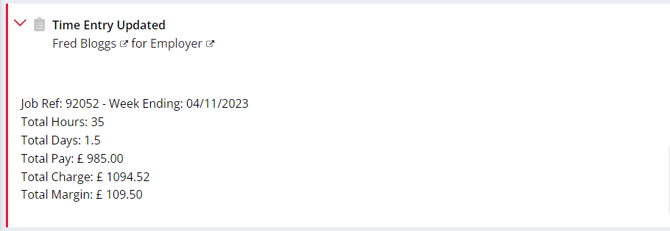
Anytime an edit to a time capture is completed, the following action is added to the Company, Job and Candidate record in their relevant Recent Activity sections: