DNS Settings
Everything you need to know about your DNS Settings in Firefish
Find out all about what DNS settings are and what yours should look like.
A domain Name Server (DNS) is like a phonebook for the internet which maintains a directory of domain names and translates these to IP addresses.
Whilst it's easy for people to remember web addresses, computers or machines access websites using IP addresses - which is a bunch of numbers unique to that website. For example, the website www.testexample.com might translate to: 198.106.255.4
When you type in a web address, e.g., www.testexample.com, your Internet Service Provider views the DNS associated with the domain name and translates it into a machine friendly IP address (the bunch of numbers) then directs your browser to the correct website.
How to check your DNS settings
You can check who hosts your domain online using a site like this one: http://www.internic.com/whois.html
Pop your web address into the box (minus the www), select Domain and Submit.
The domain provider is shown as "Registrar".
If you want to check your DNS status in certain areas across the world, you can do so by going to https://www.whatsmydns.net/
DNS for Template Websites
When you sign up with Firefish, we'll set up on a temporary URL [https://yourcompanyname.current.jobs].
To make [www.yourcompanyname.com] show your new site instead of the old one, you'll need to change your DNS settings to point traffic the right way.
Your domain registrar is the company that you bought your domain name from (eg Go Daddy, One.com, 1and1, etc). You should have a username and password to allow you to log in to this site.
Your domain registrar will allow you to change your DNS settings; you can either contact your registrar to do this, or log in to change the following details yourself:
-
A record (this is the “naked domain” ie the A record that does not have www. in front of it): remove the existing IP address and replace with 104.46.51.210
-
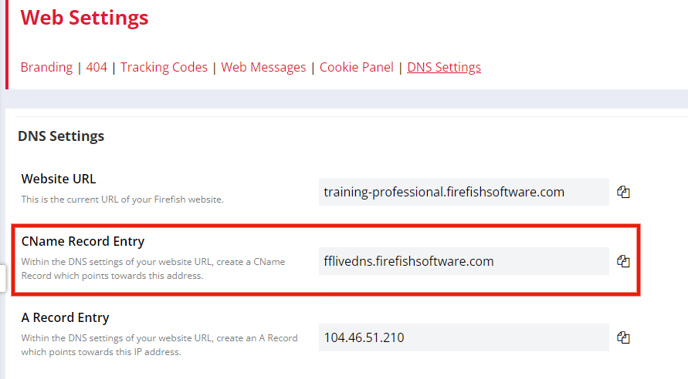
Remove the A record on the www subdomain and create a new CName Record. This should point to your unique CName Record Entry which you can find within the Firefish System on Website>Web Settings>DNS Settings

Please Note - Your Cname record may not match the above and the correct Cname can be found in the system as per the above. ]
Once you've changed your DNS settings we’ll need to create redirects for your site, so as soon as you’ve updated the settings please drop us a line providing the following information:
-
Confirmation of your website URL
-
The time at which you saved the changes
DNS changes can take up to 72 hours, so your new website may be visible right away or it may take a couple of days. Once the 72 hours are up, we'll transfer you from your temporary URL to your permanent one in our Thursday out-of-hours update.
All you'll need to remember to do once you have been transferred to your permanent web address is change the URL in your Outlook Add-In settings (if applicable).
DNS for Blended Website
When you sign up with Firefish, we'll set up on a temporary URL [https://yourcompanyname.current.jobs].
To make [subdomain.yourcompanyname.com] show your new jobs pages, you'll need to change your DNS settings to point traffic the right way.
Usually, most customers name their subdomain either jobs. / vacancies. / Careers.
Your domain registrar is the company that you bought your domain name from (eg Go Daddy, One.com, 1and1, etc). You should have a username and password to allow you to log in to this site.
Your domain registrar will allow you to change your DNS settings; you can either contact your registrar to do this or log in to the DNS Settings page to view your CName record so your sub domain is pointing to the correct record.
Please Note - Your Cname record may not match the above and the correct Cname can be found in the system as per the above.
If there is currently an A record (or any other) on subdomain this should be removed.
Once you've changed your DNS settings we’ll need to create redirects for your site, so as soon as you’ve updated the settings please drop us a line providing the following information:
-
Confirmation of your website subdomain
-
The time at which you saved the changes
DNS changes can take up to 72 hours, so your new website may be visible right away or it may take a couple of days. Once the 72 hours are up, we'll transfer you from your temporary URL to your permanent one in our Thursday out-of-hours update.
All you'll need to remember to do once you have been transferred to your permanent web address is change the URL in your Outlook Add-In settings (if applicable).
The last thing you need to do is then link your new job page to your third party website.
Testing your DNS Settings
Once you have completed all of the steps for your website, you can easily test your DNS Settings by navigating to Website>Web Settings>DNS Settings, scrolling to the bottom of the page and clicking Test DNS
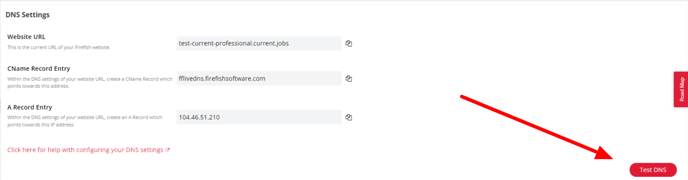
If everything is correct you'll see a success message and Firefish will be notified automatically, this is available on the Professional and Enterprise platforms. In the event something isn't quite right, you'll see a message letting you know your settings aren't correct and you should double check the above steps. Please note that DNS Settings can take up to 48hrs update so we suggest testing after this time has passed.
SSL (Secure Sockets Layer) Certificates
What is an SSL Certificate?
If you're a Firefish Professional or Enterprise customer you've probably heard us talking about your SSL certificate, but what exactly is it and why is it so important?
You'll be collecting sensitive candidate and/or contact data through your website in places such as advert applications, registration forms and contact us forms.
We apply an SSL (Secure Sockets Layer) certificate to ensure that this information is protected. Your SSL adds an extra layer of security to the connection: it encrypts all data to and from the server and your browser, then decrypts it once you've received it. This means that sensitive information such as names, addresses, phone numbers and passwords can't be intercepted or "read" by others. Your site is secure to use!
How do I get an SSL Certificate?
When your site goes live, we apply your SSL certificate which will be valid for 12 months. When your SSL Certificate is due for renewal we will renew and install the certificate at a price of £110. You will be issued with an invoice for this approximately 4 weeks before the renewal is due.
You can purchase your own SSL certificate if you'd prefer. However, you'll need to ensure that your certification is maintained and provided to us each year, and there's a cost of £110 per year for us to install it for you. Be careful if you're managing this yourself - we won't have a record of when it's due to be renewed, and failure to keep it up to date could result in your website going offline!
You can tell if a site is secure by checking out the URL. A secure site will have the prefix https:

The "s" in the prefix means that the site is secure.
If you visit a non-secure site, you'll find that the URL starts with http instead of https and often some browsers will display a security message saying that the site might not be safe e.g Google Chrome.
Using Your API XML Jobs Feed
Access and use your website API XML feed
An API XML feed is a feature that allows you to see clearly when updates are made to a website - which is great for flagging when new jobs are added to your website!
Subscribing to a website XML feed means you don't need to manually check the website for new content.
You can access your XML feed in 2 ways:
-
Go to Website > Job Search:
Go to Website > Job Search:
OR
2. Add /rss/latestadverts.aspx to your Firefish site URL.
Here’s an example of the format of what the XML feed may look like: https://jobs.firefishsoftware.com/rss/adverts/latest.aspx
Filtering & formatting your XML feed
Filtering your XML feed
The XML feeds are not pre-filtered, you (or your web designer) should be able to use JavaScript (or whatever language you are using to retrieve the XML feed) to filter it onto your website.
The XML feed contains a set of custom tags that include things like the Discipline, Role, Location, etc. These are all part of a custom ‘ffAdvert’ XML namespace that we have added and they follow this structure: ‘ffAdvert:[TagName]’.
Formatting your XML feed
The XML feed is provided in it's raw format with no formatting. We recommend that any formatting is added on your website by your web designer/developer.
If you'd like to output the html formatting of your adverts (e.g. hyperlinks, bold, italics) you can enable this option within Website > Jobs Plugin:
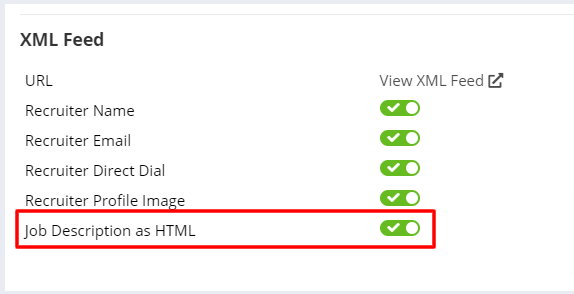
Within Website > Job Search you can also choose whether the recruiters name, email, direct dial and/or profile image should output in your XML feed:

The recruiters details are taken from the contact record of the recruiter who is assigned to each advert on your database.
Documentation for Web Designers/Developers
Your API XML feed can be used to build applications and websites that display the current live vacancy data held within your Firefish database, including the job title, description, closing date and other related data.
For more information and implementation considerations, please refer to the following documentation.
Custom Content Settings
Here's how you access your custom content settings
Super Users and Marketing Users they will now have access to the CSS page only. This will allow you to give web designers access to the page to add any CSS overrides which they require. This can be found in websites - content overrides.

In addition to the above change, when either the Header or Footer tabs are enabled within the Custom Override settings;

The corresponding colour settings will be greyed out within the Branding settings page with a hover over tool tip stating, “Currently controlled by custom overrides”.
This is to clearly indicate that the Header/Footer colours are currently being defined by the Custom Override and not the colours they see on this page.
