User Login Restrictions
Control system access with user login restrictions. Super Users can set global or per-user limits, including IP whitelisting and time-based rules. Enhance security while allowing flexible access to meet business needs.
Contents
- Global User Restrictions
- Enable IP Whitelisting
- Enable Time Restrictions
- Per User Restrictions
- Restricted Access Warnings
Global User Restrictions
Super Users can configure global restrictions to limit system access based on time and IP address. These settings apply to all users except Super Users, ensuring controlled access during specified periods and from authorised locations.
To set global restrictions:
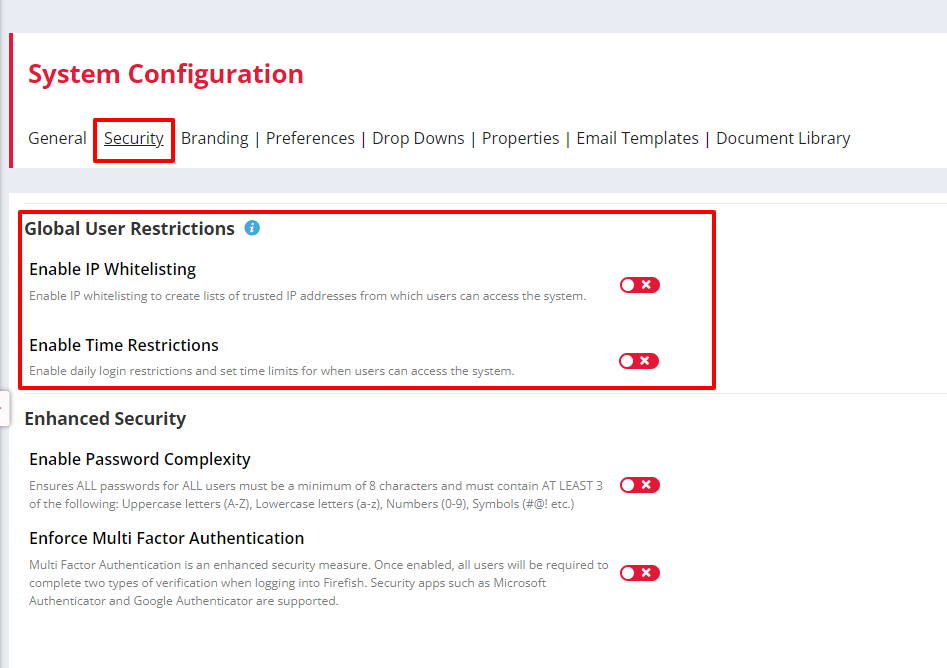
- Navigate to Settings > System Configuration > Security.
- Locate the Global User Restrictions section.
- Enable IP Whitelisting and/or Time Restrictions as needed.

Enable IP Whitelisting
IP Whitelisting restricts system access to approved IP addresses. When enabled, only listed addresses can log in.
Steps to enable IP Whitelisting:
- Click the red switch to enable the setting.
- The system auto-populates your current IP address.
- To add more IPs, click +Add and enter the address.

- Click Save to apply changes.
To remove an IP, click the trash icon next to the address and Save.

At least one IP must remain whitelisted to maintain access control.

‼️IMPORTANT: If you are adding an IP Address you will need the Public IP Address of the Device that you are using to access Firefish. To find this; simply open up an Internet Search on that Device (i.e your home computer) such as Google, and type What is my Public IP Address?
Enable Time Restrictions
Time restrictions define when users can access the system.
Steps to enable Time Restrictions:
- Click the red switch to activate time restrictions.
- Default settings allow access Monday–Friday, 9 AM–5 PM.

- Modify days and timeframes as needed.

- Ensure time periods are in 24-hour format.
- Click Save to apply restrictions.
Disabling a day prevents access for that entire 24-hour period. Adjusting times requires both a start and end entry.
Per User Restrictions
Super Users can set individual restrictions for users who require different access times or locations.
Steps to apply Per User Restrictions:
- Navigate to Settings > User Management > Users.
- Click the cog > Restrictions next to a user.

- Adjust IP Whitelist or Time Restrictions in the side panel.

- Click Save to apply changes.
Per user restrictions override global settings but require global restrictions to be active. Disabling global restrictions removes all individual restrictions.
📝 Note: As User Restrictions overwrite Global Restrictions you should ensure that the IP address listed by default in your Global IP Whitelist (typically for your office or usual place of business) isn't overwritten within the individual User Restrictions. Instead, you should add User IP Whitelist items in addition to the pre-populated Global Whitelist item.
Restricted Access Warnings
When restrictions are active, users attempting to log in will see an access denied message.

If a user is logged in when restrictions take effect, they will be logged out upon navigating to another page.

To regain access, users must wait for restrictions to lift or contact a Super User for assistance.