If you are going to be using the export functionality, you will need to enable the contract time capture settings. ![]()
- What is Tempaid?
- How to Enable Tempaid
- Payroll ID
- Changing Pay Conditions mid-contract
- How to Export Timesheets
What is Tempaid?
Tempaid is a specialised recruitment pay & bill system designed for temporary workers. Via our optimised CSV export, Tempaid efficiently processes timesheet, candidate, and company data from Firefish to ensure a fully compliant payroll and invoicing solution.
How to Enable Tempaid
Enabling Tempaid will allow you to export your timesheets and assign candidates a unique Payroll ID.
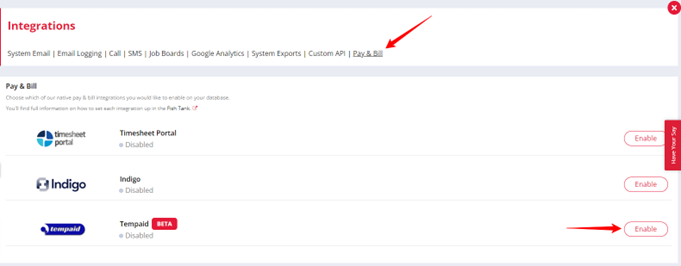
To enable the Tempaid Integration, a Super User can go to Settings > Integrations > Pay & Bill and click Enable for Tempaid.
The following fields will become enabled and mandatory and must be completed before you can place a candidate on a contract job. These fields must be completed by the Job Offer Compliance stage for both Candidates and Companies and the Job itself. All mandatory fields required will display a tooltip when hovered over in the candidate compliance side panel.
Candidate Mandatory Fields
- Address Line 1
- Postcode
- Mobile Number
- Date of birth
- Gender
- Pay Type
- Pay Method
- NI Number
- Bank Details (Account Name, Account Number, Sort Code, Bank Name)
If Self-Employed is selected as the Pay Type, then the following field will be mandatory:
- Contractor Engagement Type
Company Mandatory Fields
- LTD Registration
Contract Job Mandatory Fields
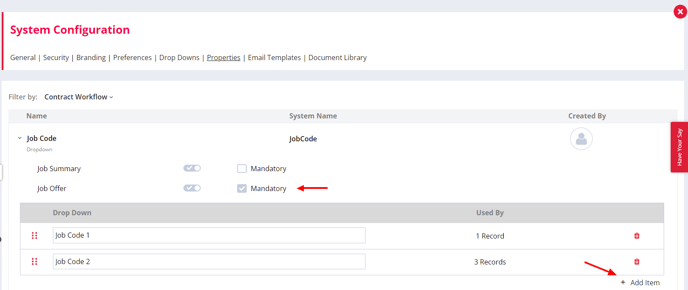
- Job Code
To configure the dropdown options available in the Job Code field, a Super User can go to Settings > System Configuration > Properties > Contract Workflow. The Job Code field will be enabled and locked on the Job Summary with the option to make it mandatory, and on the Job Offer page it will be enabled, locked and mandatory.
To add values to the Job Code dropdown, click the +Add Item button and don't forget to click Save at the bottom of the page when you are done.
Custom Fields
Any custom fields added to the Contract Workflow will be included on the Tempaid Export. A good example of this is if you need to add a Purchase Order number to your contract placements.
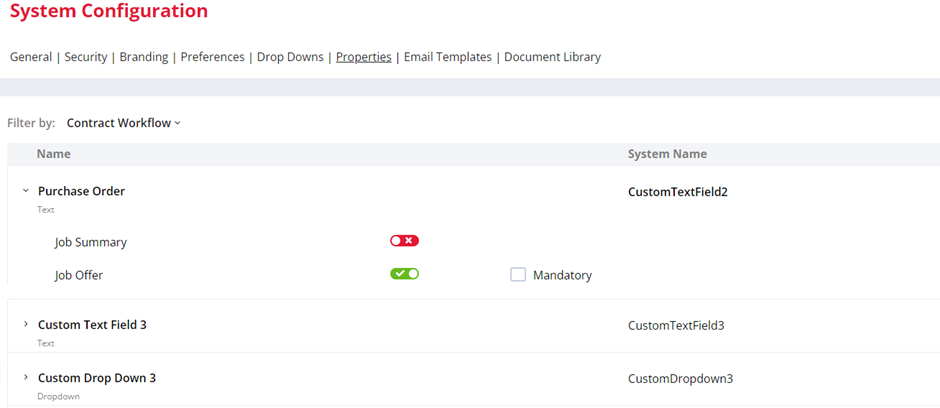
Any field included at Job Offer will also be included on the Placement CSV file that is generated by the Tempaid Export.
Note: You will need to liaise with Tempaid separately if you are adding additional custom fields to your exports to ensure that they recognise and accept the information.
Payroll ID
Whilst Tempaid is enabled, Firefish will generate a unique Payroll ID for any candidate placed in a contract job.
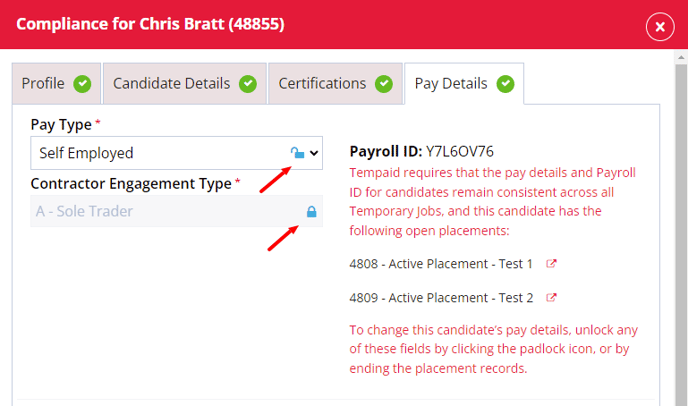
Tempaid requires that the Payroll ID is submitted as part of the candidate's record so that their pay information is consistent across all current and future placements.
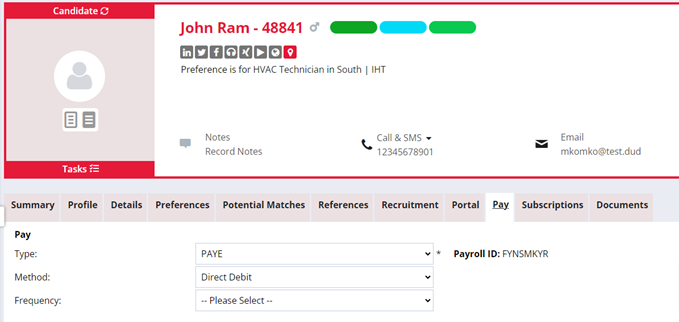
To generate the Payroll ID, navigate to the Pay tab in the candidate profile and select an option from the Type dropdown. Saving changes to the following fields in the pay tab will cause a Payroll ID to be generated automatically:
- Pay Type
- Contractor Engagement Type
- Supplier
- LTD Number
The Payroll ID can also be generated at the offer stage of a Job by clicking the Compliance status icon and navigating to the Pay Details tab within the side panel.
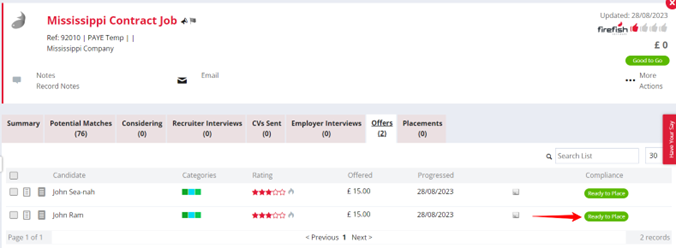
All fields from the Candidate Pay tab will show on the Pay Details tab of the side panel. A warning message will display every time one of the fields is updated within the Candidate Pay tab or Job Offer Compliance Side Panel. If confirmed, this will update the fields in both locations and generate a new Payroll ID for the candidate.
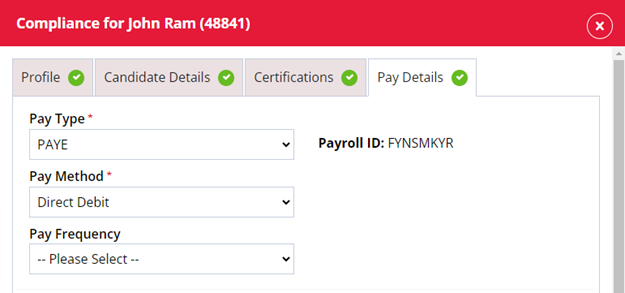
Changing an existing Payroll ID
If a candidate’s pay conditions change, their Payroll ID needs to be regenerated for the purposes of accurate payroll in Tempaid. The reason for these changes could be any of the following:
- Moving from one Pay type to another (e.g. PAYE to Self Employed)
- Moving from one Umbrella company to another (Only if the Ltd Number is changed)
- A change in Ltd Number
- A change in Engagement Type (e.g. Sole Trader to Ltd Company)
Tempaid requires that a Candidate’s Payroll ID remains consistent across all open placements, so fields that could potentially change the value are locked so that any mistakes that would affect the worker’s pay can be avoided.
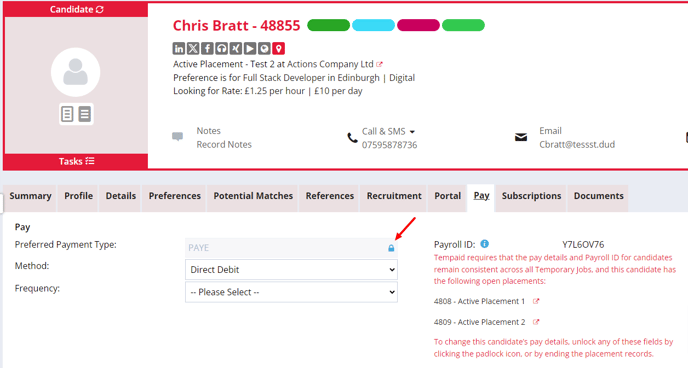
When making a change that would cause the Payroll ID to regenerate, you will be given the following warning message:
-
Clicking yes: save the changes and generate a new Payroll ID
-
Clicking no: save the changes, but do not generate a Payroll ID
-
Clicking X: cancel the operation and do not save any changes
Note: You must ensure that all outstanding placement and time-capture information for the candidate has been exported before making any changes.
Changing Pay Conditions mid-contract
If a candidate’s pay conditions need to change whilst in the middle of a contract, this can be done in one of two ways:
- By clicking the blue padlock icon against the field you need to change
- By ending all active placements associated with the candidate
Once the change has been saved, all placement and time-capture exported from that point will use the new Payroll ID.
How to Export Timesheets
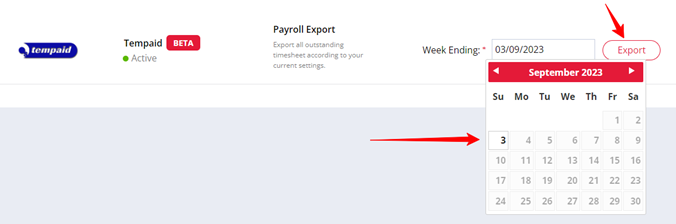
The Tempaid export allows all your contracts with timesheets submitted to be exported into CSV files. Each export will display all timesheets for the chosen week and will not show any weeks dated before or after the week ending that you exported.
To export a week of timesheets, a Super User can go to Settings > Integrations > Pay & Bill and select the Sunday that the chosen week ends on from the date picker.
Note: Sundays are the only date available to be selected within the Date picker and this currently cannot be changed.
Click Export and the zip file will be exported into your downloads folder within your Browser and your downloads folder within File Explorer.
If you refresh the Pay & Bill page after a successful export, you can see the last date/time an export occurred and the user who completed the export.
After you have successfully exported your timesheets, if there are no outstanding timesheet overdue then the Time Capture lozenge will update to Submitted.
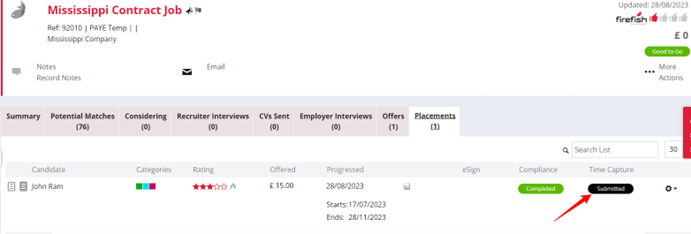
An action will be recorded within the Candidate and Jobs Recent Activity streams to display all the relevant information to the timesheet that has been submitted for that week.

Each Export Zip file contains 3 CSV files:
- Placement
- Candidate
- Client
All 3 CSV files will have the date of the export held within their file name to identify each timesheet export.
The Placement CSV will display all information relating to the job(s) that the candidate(s) are placed on. Custom Fields will be added to the CSV with the name given to the field within Firefish.

The Candidate CSV will display all information relating to the candidate(s).

The Client CSV will display all information relating to the companies involved with the job contracts that are exported into the Placements CSV.
