This guide covers key CRM features: candidate portal, reference management, pay details, document uploads, and compliance tracking. Learn to manage profiles, references, payment info, documents, and ensure compliance, all within a single platform.
Candidate Portal
The Candidate Onboarding Portal allows Professional and Enterprise users to give candidates access to a portal where candidates can do the following actions themselves:
-
Update their profile and CV
-
Search available jobs
-
Update their compliance details
-
Update their communication preferences (email marketing, SMS and job alerts)
-
Update their their reference details and give permission for them to be contacted
Any changes candidates make to their profile, references or preferences will be reflected in your Recruiter Portal, allowing candidates to keep the data you hold on them up-to-date and correct.
For more in depth information on the candidate portal please head to our Candidate Onboarding Portal page.
Candidate Compliance Details
Candidate details (also known as compliance details) are bespoke fields that can be used to record additional specific information about candidates that may be industry-specific to your company.]
For information on how to create compliance details please head to our Create Compliance Details page.
Compliance details are customised details which will appear in the Details tab of your candidate record, as shown below:

All candidate details are visible in the Details tab of a candidate's record, even if they've not been populated - making it easier for you to view and make changes to details of each of your candidates.
If any of your details require documents, you can upload them and preview them by clicking the document icon
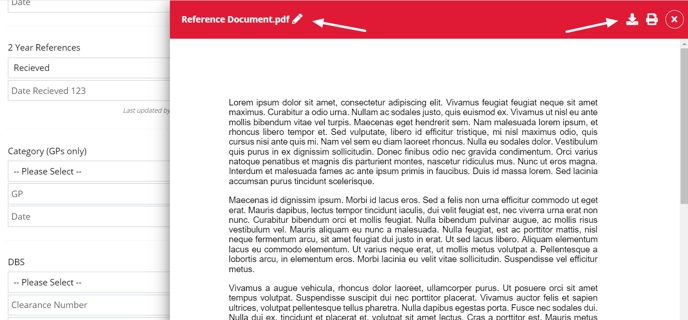
From here you can download, print and even rename the document
Candidate details can also be made visible in the candidate portal, allowing your candidates to populate their own details via the "My Details" tab in the candidate portal - which saves you time updating each detail (Candidates will also be able to preview, download, print and rename documents they upload via the portal). Super Users can configure this setting for each detail via the Compliance Details settings page.
Via this settings page, each detail can also be set up to appear at the Registration, Permanent Job Offer or Contract Job Offer stages. They'll then appear when you're confirming a placement, as shown below:
These fields can also be set as mandatory - for example, if a PVG is necessary before you place your candidate, this can be set up as a mandatory candidate detail ensuring no candidate is placed without the appropriate compliance being obtained.
If a detail is mandatory and it hasn't been filled in, you will not be able to click away from the Details tab in a candidates record. What you can do is click the X on the top right-hand side of the page.
Why use Candidate Details?
Candidate details are a great way to record information on candidates that aren't standard fields on Firefish. These are generally used differently on all systems and allow users to record details on the candidates which may be unique to you or the industry in which you recruit.
Here's a few examples of what they may be used for:
-
CSCS Card Details
-
Driver's License
-
Visa Information
-
Proof of Addresses
-
PVG/DBS Checks
Candidate Details can record data in up to 4 formats: dropdowns, free text fields, recording dates and uploading documents. You can also add a follow up date to any details with a date field enabled.
Super Users can configure each field types and follow up dates for each detail via Compliance Details settings.
Expired Candidate Details
Any candidate detail which is either approaching expiry date, or has already expired will appear under the Compliance section of your To Do List.
Within the expired details list, you can search or organise these details in a number of ways: by owner, categories and rating/hot candidate columns. As well as the last updated date which will display under each candidate's name.
The data of each detail can also be easily viewed by clicking the notes icon as highlighted below:
Performing actions on each entry can be done by clicking on the ellipsis icon:
Complete will remove the entry from your Expire Details to Do List. Request details will open up a side panel, allowing you to email the candidate and record a follow up action:
Follow Up Call will also open up a side panel, allowing you to record a follow-up call for a particular candidate.
Please note that if you are adding a date to your detail, the system automatically picks this up as an expiry date. So if it's a date of completion, this will appear in the expired details tab.
Pay
The Pay Tab is where you can store any candidate payment information, such as bank details or Ltd company details for contractors.
Here you can select the a candidates preferred payment type of PAYE, Self Employed or any custom pay types that have been added.

When Self Employed is selected the Contract Engagement Type field becomes available. From this drop down you can select one of the following values depending on the country setting selected in System Configuration > Date & Calendar Settings:
|
United Kingdom
|
Non-UK
|
If a candidate is using an Umbrella company, you can select this and auto-populate their details from your Supplier Directory.
The following fields are available when Self Employed is selected:

When PAYE pay type is selected the following fields are available:

Documents
You can find all Candidate documents in the Documents tab.
There, you can upload the candidate's CV, Formatted CV or any other relevant documents by dragging and dropping a file or clicking the upload icon to search for a file on your computer.
In the record header, you'll see document icons - the colour of these icons tell you what stage CV processing is at:
Orange = CV is awaiting processing
Blue = CV has processed but contains less than 200 words
Black = CV has processed successfully
Red = CV has failed processing
The most recently uploaded CV will be processed and searched in all keyword searches throughout the system.
If you click the CV or Formatted CV icon, the CV document will appear in the side panel instead of downloading. If you want to download the CV, click the download icon in the side panel.
You can also see who uploaded each CV document and when it was uploaded.
Don't forget that all documents can be previewed, downloaded, printed and renamed from here. Just click the document to open the preview side panel!
References
In the Reference tab, you can store candidate reference information as referee details or as documents. Documents can also be previewed, downloaded, printed and renamed by clicking the document icon.

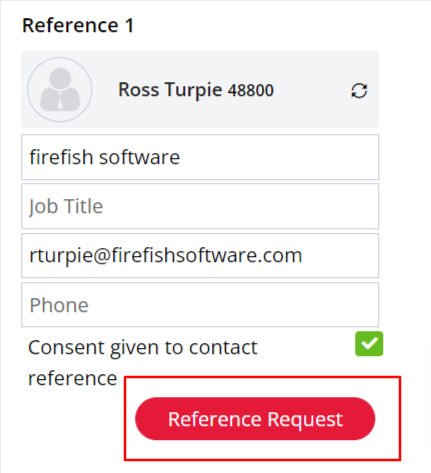
In this example, Reference 1 (Ross Turpie) was an existing contact on the system, so his name is also a hyperlink which would take you to his Contact page when you click it.
However, Reference 2 (Gerard Smith) is not on the system as a Contact, so his name does not show as a hyperlink.
When requesting a reference, you can use the Reference Request button to send the referee an email. This button is disabled until the 'Consent given to contact' tick box has been ticked.
When requesting a reference, a Reference Requested action will be created in the candidate's Recent Activity:
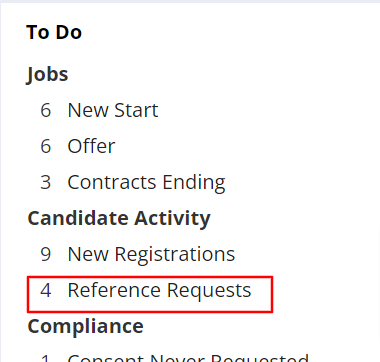
You'll also see an item has been added to your Reference Requested To Do List on your Dashboard:
If you have uploaded a Reference Document to your System Document Library you'll see it automatically attached to the Reference Request email. Clicking the document will allow you to preview it before sending.
You'll also see a Reference Received action has been created in the candidate's Recent Activity. If you have information populated in the reference fields before you upload the document, then this information will appear in the action. If you haven't filled them out before the document is uploaded, the action is still created but it wont contain the reference information:


